

Making bread sculptures one of my favourite food arts… Making bread sculptures with our kiddos means flour dust in the air, sticky little fingers and young imaginations running wild. Kids love getting really messy with gooey stuff — and as a parent, you’re probably always on the lookout for new ways to encourage your little ones to get creative. Bread sculptures are a fun, easy way to engage toddlers and preschoolers and help develop creative-thinking skills.
Making the Dough
There are a few routes to take when it comes to the dough. One is the easy way: you can simply buy ready-made bread dough and you’re good to go. And if your little one is anxious to start sculpting, this way is probably a good idea. The other route is to go all out and make your dough from scratch. If you go with this option, you’ll need 2 cups of flour, 1 cup of water, 1 package of dry yeast, 1 tablespoon of oil and 1 teaspoon of sugar. You can find basic bread dough recipes in most cookbooks. Be sure to involve the little one in the process, especially the kneading part.
Sculpting
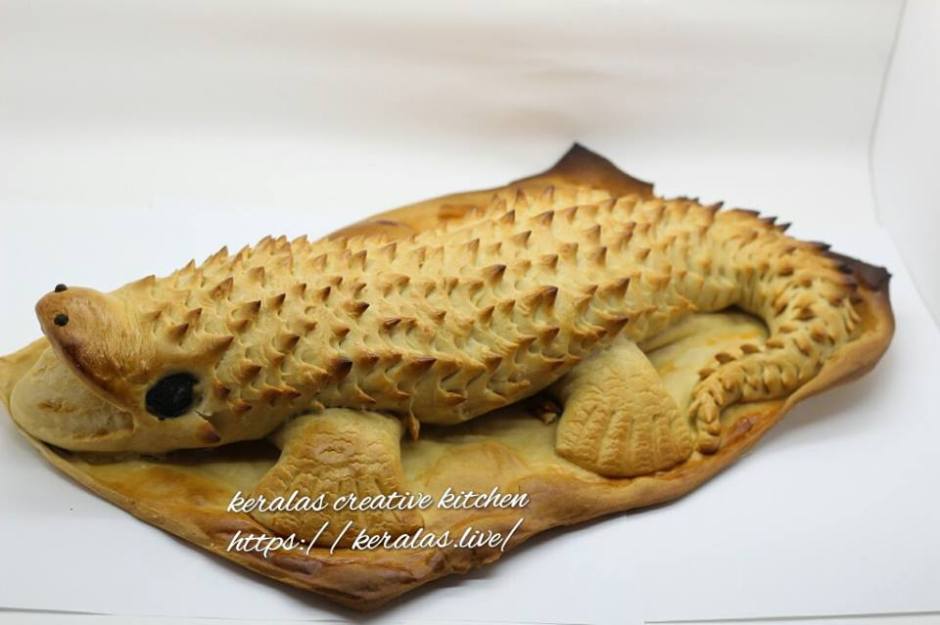
Once your ready-made or home made dough has risen sufficiently – according to your recipe or the package directions — it’s time to sculpt. Be sure to have a bowl of flour nearby to keep little hands from getting too sticky. Have your little sculptor shape the dough into whatever she wants. You might need to offer some suggestions if your kiddo is having a hard time figuring out what to sculpt — or if her brilliant ideas are stifled by the limitations of bread dough. Go with simple designs like a crocodile, snowman, cat, snake, or sunflower. Show your little one how to press smaller pieces of dough into larger pieces so they don’t separate when baking. But don’t try to perfect your kiddo’s “designs.” She won’t care if one of the cat’s ears is smaller than the other – and you shouldn’t either. Knowing that she created the designs all by herself will give her a sense of pride and accomplishment.
Adding Extras
Your kiddo will likely love to add a bit of flair to his “sculptures.” Offer him extra edible bits to add some details. If he wants to make a face, raisins work well for eyes, noses and a mouth. You can also offer some chocolate chips and a carrot to create a snowman. Let your little one get creative. Maybe he’ll want to use the top of a celery stalk for hair — or use olives for eyeballs. Show him some options, but let him decide what he wants to use.
Bake and Enjoy!
Once the sculptures are shaped, place them on a baking sheet and let ’em cook. As the aroma of baked bread permeates the house, let your kiddo see his creations baking if you have a glass window on your oven door. Once the sculptures are golden brown and make a hollow sound when you tap them, pull them out and let them cool. After your little artist has finished admiring his masterpieces, get out the butter and jam — and enjoy a tasty treat together.

Could you sometimes post your kids’ creations, including the process? It will be very motivating for many adults and maybe inspire them to bring their kids into the kitchen.
LikeLiked by 1 person
Hi Dolly, next time I will post kids creation with the process. It’s true could be a motivation for many other parents to bring kids into the kitchen.
LikeLiked by 1 person
I used to make cookie cats when I was little, but this crocodile is amazing, like all your food art! Did your little one make it?
LikeLiked by 2 people
Hi dolly, thanks for the compliment. Working with dough is a real fun, especially with kids. It’s bit messy they love it. Cookie cat is a fun figure to make😊I am trying to teach my little ones.
LikeLiked by 1 person
I have done all kinds of food fun with kids in camp and with my own grandkids, but I am not an artist like you, of course! How old are your little ones?
LikeLiked by 1 person
Hi Dolly, food fun with kids is great, I love working with then. Mine is two boys 3 and 5💣💣
LikeLiked by 1 person
Omg! This is incredible. While we ordinary mortals struggle to bake our basic bread. Your kids can do stuff like this?? Wow!! Wouldnt the aeration disappear from the dough if we sculpted it. This is something I need to learn 👍☺
LikeLiked by 2 people
Thank you.
LikeLike
That is so cool. There is a bakery in Albuquerque, where I live, called Golden Crown Panaderia, and they make turkeys out of green chili bread. You should check them out online. Your stuff reminds me of theirs.
LikeLiked by 2 people
Thank you Vanessa for the feed back.❤ I will check out them on line, nice to know some thing new.😚
LikeLiked by 1 person
your posts literally make me drool!! so glad to have discovered your blog! thanks for sharing 🙂
LikeLiked by 2 people
Thank you:)
LikeLiked by 1 person
This is cool! Thanks for stopping by my blog. I am checking yours out. I need some variety in my kitchen. i love bread and this my granddaughter would love to do this. Neat idea!
LikeLiked by 2 people
Thanks Nancy. Hope your grand daughter will enjoy sculpturing with bread..
LikeLiked by 1 person
Wow!!
LikeLiked by 2 people